

How To Draw Bodies Step By Step
In this man trunk cartoon tutorial, you'll acquire basic homo body outline cartoon techniques. If you lot've practiced capturing free energy in the previous tutorial, you'll have acquired a skillful experience for loose sketching of people. We're going to get-go giving structure to that feeling-based groundwork by studying the body with a more than scientific eye.
Let me say that it will take many sessions to cover the wonders of the homo torso. Non only is it among the most sophisticated beast structures in nature, information technology is likewise one of those with the well-nigh variations: few other species come in so many shapes and colors. Nobody, therefore, should feel frustrated for having trouble cartoon people; it is an ambitious undertaking.
We're going to build upward this skill from the basis up, in the same order as the drawing process, starting with a simplified body drawing skeleton (the bones effigy or stick figure), moving on to the volumes of muscle structure, and so finally the details of each part of the body and face.
The first key skills to acquire are human proportions drawing techniques. And we're going to be practicing with this basic effigy for a while to become familiar not only with the conventional "ideal proportions", but also with the style they vary with gender, age, and fifty-fifty ethnic background.
If y'all're cartoon digitally, perhaps you want your work to wait every bit if it's created with pencil and newspaper. If this is the example, may nosotros recommend one of the many Photoshop brush sets available on GraphicRiver, including this Classic Art Castor Pack.


What You Will Learn in This Human Trunk Cartoon Tutorial
- How to describe the human body pace by footstep
- Basic man trunk outline drawing
- Human contour drawing techniques
- Human being body proportions cartoon
- Body drawing practice exercises
How to Depict a Torso: The Bones Figure
Create Your Chart From Heads
Let's begin with man drawing basics. A well-proportioned effigy, regardless of variations due to gender and such, is divers by the alignment of the joints, which is invariable (that is, we perceive something odd if information technology does vary). This is our background for proportions. Draw your own chart with me as nosotros go—it really helps with learning the textile.
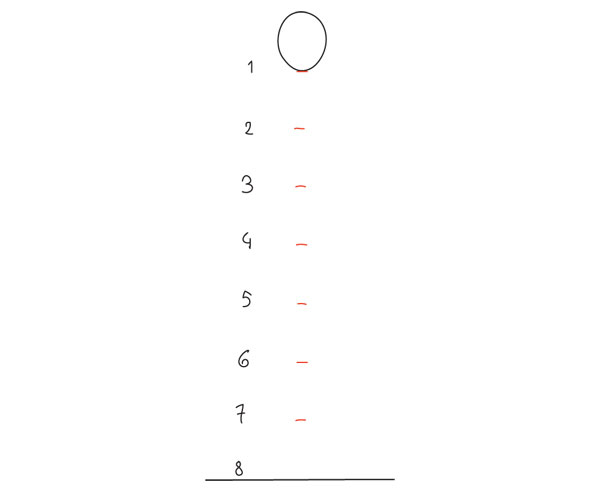
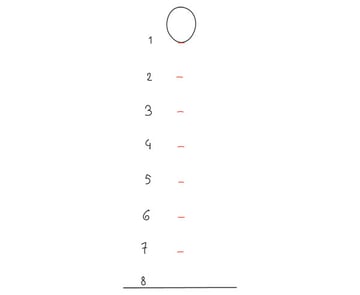
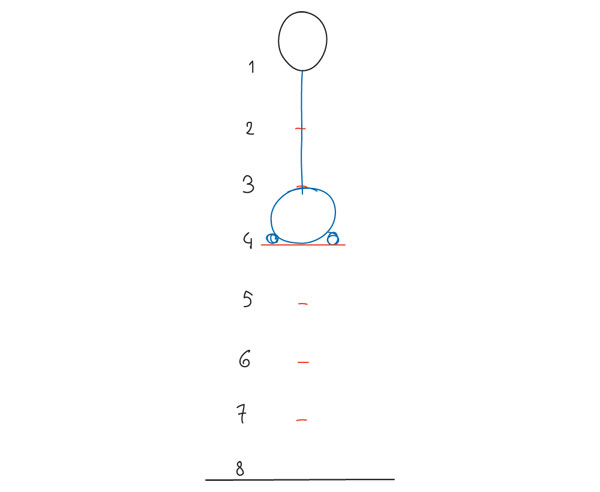
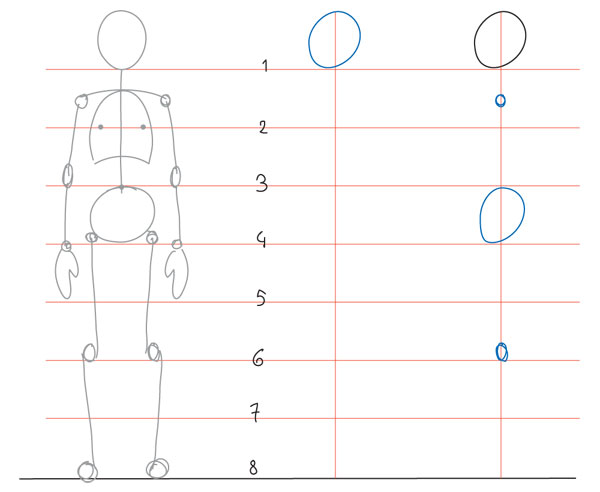
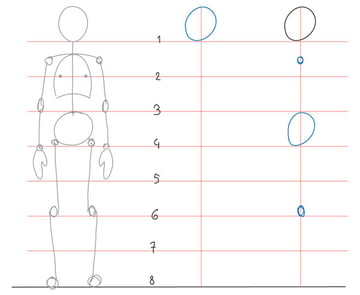
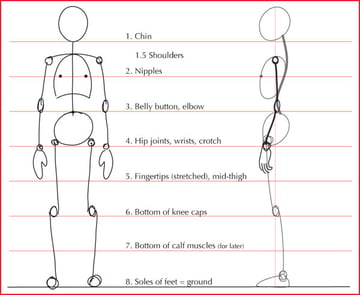
To acquire how to draw a body, we start with the head. Showtime by cartoon an oval or egg shape (pointy end down) for a head, and mark down 8 measurements, the last one existence the footing.
The measurement (ideal male pinnacle = viii heads) was set downwardly during the Renaissance every bit an idealization of the human form. Information technology's rather obvious that very few people are actually 8 heads tall (even Northern Europeans, who served as the basis for this model, are closer to vii heads), but this is still the best model to beginning with, as it makes information technology easier to grasp the alignments.
The Pelvis
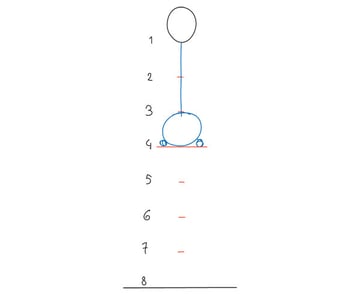
Add the pelvic os adjacent, simplified as a flattened circle between marks 3 and iv, with the hip joints sitting on 4. Its width is roughly 1.5 to 2 head-widths. You can at present draw the spine connecting the head to this well-nigh of import role of the body, its heart of gravity and stability.
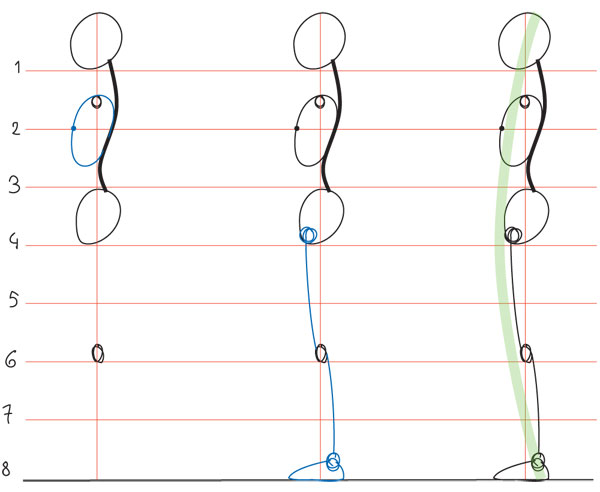
The Legs and Knees
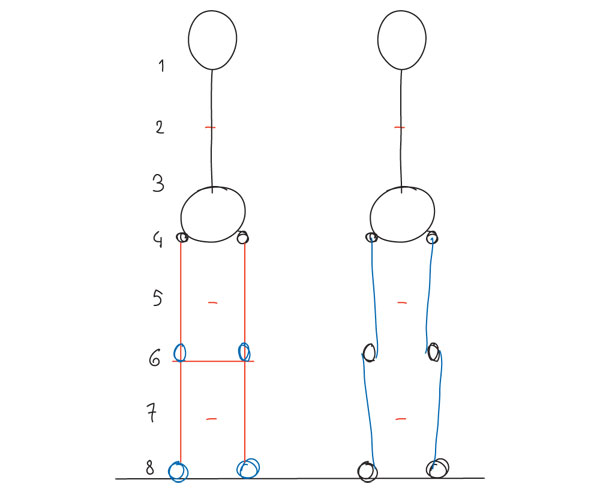
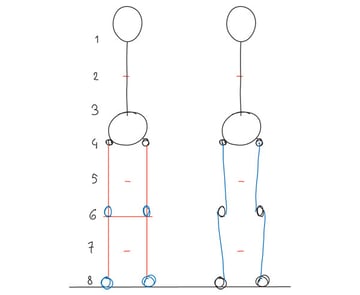
Let's presume this figure is standing with the anxiety vertically aligned with the hip joints. The knee joint joints sit down on mark 6, as that line corresponds to the lesser of the kneecaps.
When the leg is stretched out, the knee joint joint is placed on a straight line with the hip and ankle (left). Merely this straight line is virtual: to complete the leg, connect the hip joint to the inside of the kneecap, and then again, the outside of the knee to the within of the ankle (right). This is a very simplified but accurate representation of the bodily bone structure, and it helps in drawing the natural await of the human being leg, which tapers in from the hip, and then staggers out at the knee, and tapers in once again. It as well helps with placing the muscles at a after stage.
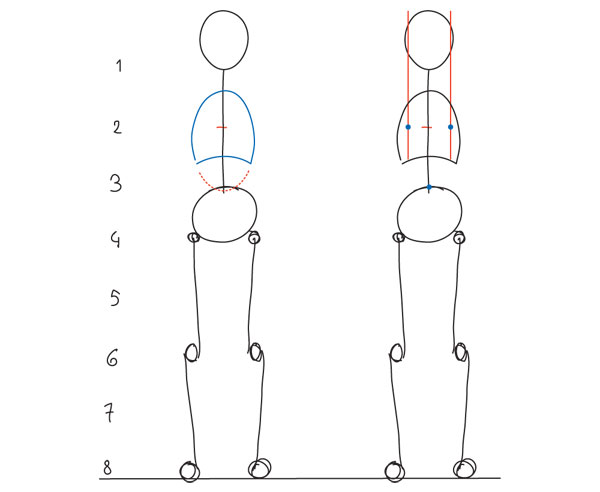
The Ribcage, Nipples, and Belly Push button
The ribcage-lungs group is the third of import volume of the trunk, after the head and the pelvis. Simplified, it is an oval that starts halfway between 1 and 2, downward to marker 3; but information technology is best to chop off the lower part of it as shown hither to imitate the actual rib cage, as the empty office betwixt the two volumes is important: information technology is soft and subject to change (flat abdomen, soft belly, wasp waist) and it is as well where the most torsion and move happens in the spine. It's practiced to be aware of that and not to attach the trunk and pelvis together like two blocks, as that would "block" your drawing'south range of motion. The width of the oval is roughly the same as the pelvis for now.
Two more details here: the nipples fall on mark 2, just inside the sides of the head, and the belly button on marker 3.
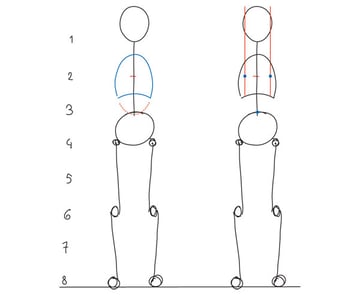
The Shoulders
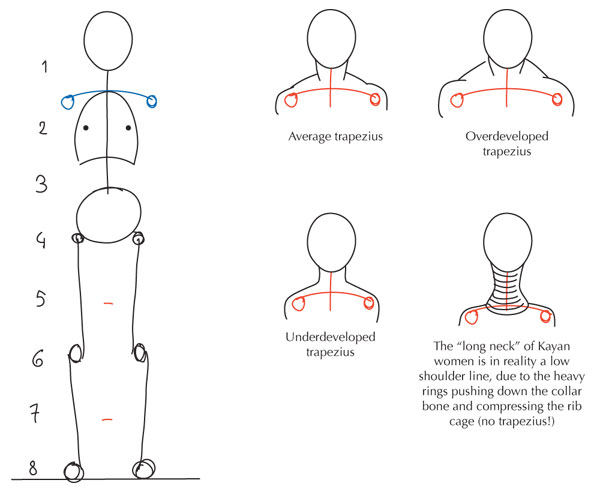
The shoulder line is about halfway between marks 1 and 2, with the shoulder width 2 to 3 head-widths, but its apparent position can vary a great deal. To begin with, it'due south slightly curved down, just in tension the shoulders tense upward and the bend can itself plow up and look higher. Furthermore, the trapezius muscle, which from the front appears to connect the shoulder with the cervix, is highly individual; if information technology's very muscular or carries much fatty, it can make the shoulder line await then high at that place's no neck; inversely, an underdeveloped trapezius, ofttimes seen in very young women, gives the impression of a long neck.
This brief digression into non-skeletal details is to ensure there's no confusion betwixt the bodily position of the shoulder line and its apparent placement in a fleshed-out body, some examples of which are shown below.

The Arm, Wrists, and Hands
Finally, the arms. The wrists are on marker 4, slightly below the hip joints, which sit on information technology (you tin exam it out for yourself by standing up and pressing your wrists against your hips). The fingers terminate roughly at mid-thigh, which is mark 5. The elbows are a slightly complicated joint that we'll examine in detail later, only for now it's helpful to mark them as elongated ovals sitting on level 3.

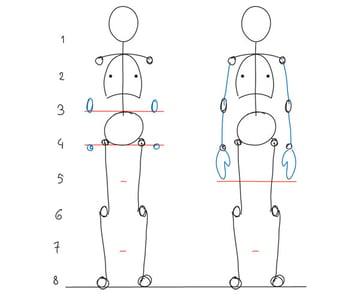
We're done... almost. Before summing this up, allow's extend those marks into lines and meet how this works in contour.
How to Draw a Torso: The Basic Profile
The side by side pace in learning how to depict a body is the profile. Starting time by cartoon the caput again, the same egg shape but with the terminate pointing diagonally down, and drib a vertical line from the crown to the basis.
In an erect posture, yous can identify the pelvic bone (a narrower version of the caput's egg), the shoulder, and the knee roughly on this vertical line. They are on the same level every bit before: all the joints are, but the others are not on the same plane every bit these.
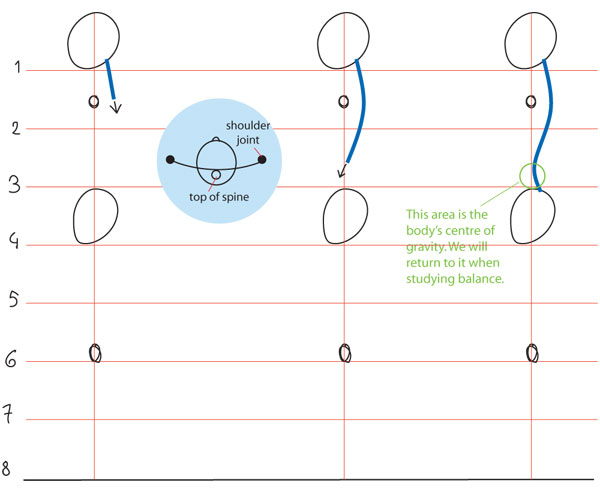
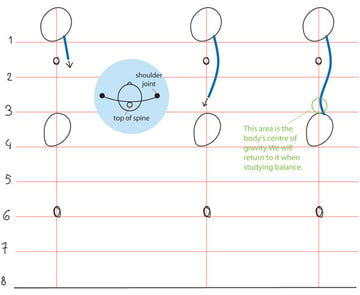
The Spine in Profile
From the side, the spine is revealed every bit being shaped like a flattened "S". From the base of the skull, information technology moves down and dorsum till it reaches its furthest bespeak at the level of the shoulders (between the shoulder blades). Note the shoulder joints are ahead of the spine! This is considering, again, the shoulder "line" is in reality an arc: the medallion shows a top view of information technology.
The spine then comes back forward, and peaks over again (inward) a little above the pelvis (the small of the back, which varies in depth and can make for an biconvex back). Finally it changes direction again briefly and ends in the coccyx or tailbone.
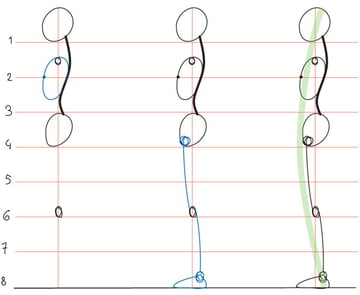
The Ribcage and Legs in Profile
The ribcage is closely attached to the spine, and, in a reasonably fit body continuing erect, the breast is naturally pushed forward.
The hip joint is alee of our vertical axis, and this is counterbalanced by the ankle being a chip behind it. And so our hip-knee-ankle line is slanted backward, and staggered over again: from the hip articulation to the front of the knee, and from the dorsum of the human knee joint to the ankle.
The overall issue of this posture is a visual arc from head to chest to feet (in green), and when it's flattened or reversed, we perceive an uncertainty or slouch in the posture.
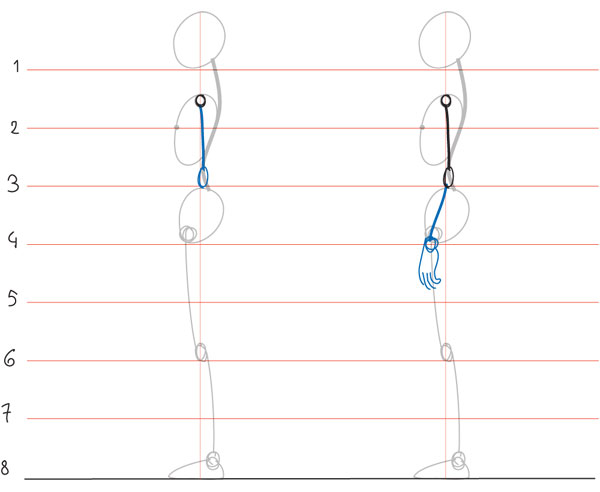
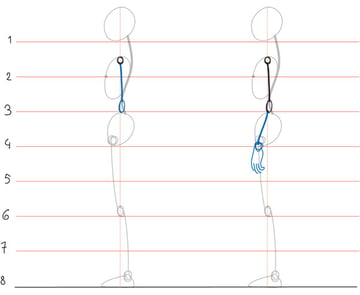
The Artillery in Profile
Finally, the arms. The upper arm falls adequately straight from the shoulder, and so the elbow can be aligned with the latter (or fall slightly backward). Only the arm is never fully stretched when at rest, so the forearm is not vertical: the arm is slightly bent, and the wrist falls forrard, right over the hip bone. (Also, when the hand is relaxed, the fingers ringlet a little, as shown here).
How to Draw a Trunk: Summary
This completes the bones, undifferentiated human proportions drawing tutorial. Here'due south a diagram to sum up all the human being body outline cartoon techniques we reviewed:

Human Body Proportions Cartoon Reminders
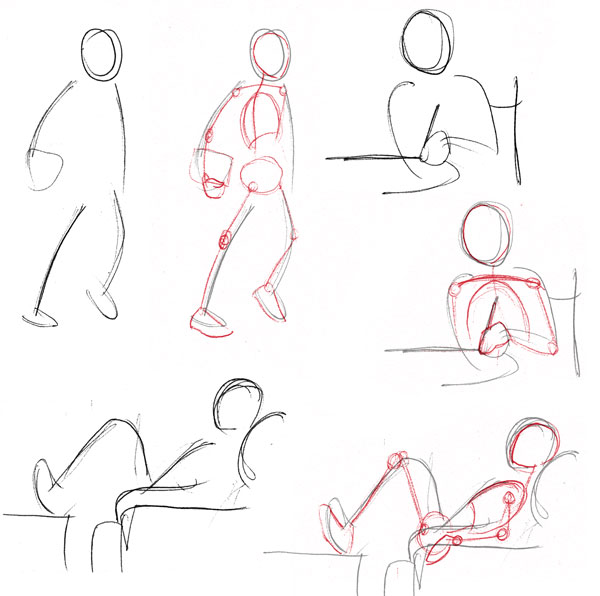
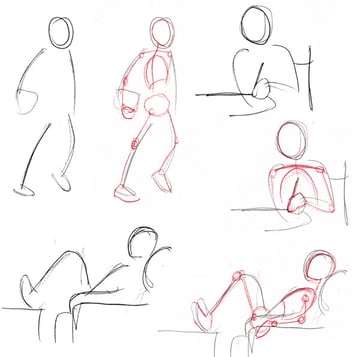
The post-obit human proportions drawings are a few useful visual reminders based on the body. They come up in handy when the body is not standing upright.


Torso Cartoon Practice Exercises
We've covered a lot of material in this body anatomy drawing tutorial. Now is a good time to interruption the studying and familiarize yourself with this basic effigy and the principles of cartoon human body proportions. Then, we'll move on to the differences between male and female structures (and others). For case, you tin integrate this new knowledge into your daily homo drawing sketching exercise past overlaying a quick energy sketch with this correctly proportioned basic figure.
Human Proportions Cartoon Tips
I consistently start with the caput, merely it doesn't really matter what part of the body you start drawing, if y'all're comfortable and go a good result. If y'all're unsure or are having a difficult time, and then I suggest trying with the caput first.
Get used to drawing this basic figure with a light hand, since the finished body will be built upwardly over it. Traditionally, the final lines are inked and the guidelines then erased (hence the importance of a light hand), just even when I'm sketching with a ballpoint pen with the intent of inking on a dissimilar sheet past transparency, keeping a light hand ensures I tin come across what I'g doing.
Discover More Crawly Homo Drawing Tutorials
I hope you lot've enjoyed this tutorial about how to draw the man body step by step. If you want to learn even more, we've got this great learning guide: Human Beefcake Fundamentals. There you'll find detailed homo cartoon tutorials and resources like these:
Editorial Note: This post has been updated with contributions from Maria Villanueva. Maria is a staff writer with Envato Tuts+.

Source: https://design.tutsplus.com/articles/human-anatomy-fundamentals-basic-body-proportions--vector-18254
Posted by: nivensonst1959.blogspot.com
0 Response to "How To Draw Bodies Step By Step"
Post a Comment